Previously I showed you How to Create a Recurring Event in Kentico. One of Kentico's features I forgot to take into consideration is multiple sites on one code instanace or multi-tenancy. Today I'll show you a couple code modifications and additions you can make to ensure only the sites you want to have access to this feature, get it.
There are't many client's I've come across who have multiple web sites running in one instance of Kentico. But when I do, they have 2 sites or hundreds. Take a look here on how to grant access to this feature to additional sites.
Site Management
We need a place to manage what sites will have access to this awesome feature. So why not just use the Sites module within the Events page type? Well, this will allow or deny full access to the page type and we only want to allow or deny access to a few of the fields in the page type, not everything. Now you ask why not create a new page type and just inherit the Event page type with the fields needed for recurring events? Well, I forgot all about this feature when I worked on this so maybe that will be another blog post for later.
The simple setup is to create a custom table with one field, SiteID. The site ID will use the site selector form control. You won't find this in the list of form controls on your interger field just yet. You will need to go to the Form Control app and search for "site". Select the Site Selector form control and check the Custom table checkbox. Now navigate back to your new custom table and set the form control for that SiteID field. Take note of the code name you have for the custom table, you'll need this later.
Recurring Event Modifications
I've modularized the code a bit more now which includes custom functions, methods and macros. I've added a simple EventHelper.cs class that I've moved my functions/methods to for reuse later. Here is the simple check to see if a site is allowed to use the recurring events.
    /// <summary>
    /// Checks the permissions to see if a site has access to create recurring events or not
    /// </summary>
    /// <param name="siteID"></param>
    /// <returns></returns>
    public static bool CanCreateRecurringEvents(int siteID)
    {
        bool returnValue = false;
        try
        {
            if (siteID > 0)
            {
                var sites = CustomTableItemProvider.GetItems("CustomTable.RecurringEventsPermissions").WhereEquals("SiteID", siteID);
                if (sites.Count == 1) returnValue = true;
            }
        }
        catch
        {

        }
        return returnValue;
    }
I've also added a simple function call at the beginning of the CreateRecurringEvents() method to exit the method if a site doesn't have permission.
    public static void CreateRecurringEvents(DocumentEventArgs docEvents)
    {
        // do some checking first to see if they can even create recurring events.
        if (!CanCreateRecurringEvents(SiteContext.CurrentSiteID))
        {
            return;
        }
       ....// rest of the method
   }
Create a custom macro Method
Now that we have the simple function in place to check if the site has access, lets create a macro so we can hide and show fields. This macro takes advantage of the static helper class and function.
using System;
using CMS.MacroEngine;
using CMS.Helpers;
using CMS;

/// <summary>
/// Summary description for MacroMethods
/// </summary>
[assembly: RegisterExtension(typeof(CustomMacroMethods), typeof(StringNamespace))]
public class CustomMacroMethods : MacroMethodContainer
{
    [MacroMethod(typeof(bool), "Checks to see if the current site allows use of the Recurring Events", 1)]
    [MacroMethodParam(0, "param1", typeof(int), "Site ID of the site to check")]
    public static object CanCreateRecurringEvents(EvaluationContext context, params object[] parameters)
    {
        // Branches according to the number of the method's parameters
        switch (parameters.Length)
        {
            case 1:
                // Overload with one parameter
                return EventHelper.CanCreateRecurringEvents(ValidationHelper.GetInteger(parameters[0], -1));
            default:
                // No other overloads are supported
                throw new NotSupportedException();
        }
    }
}
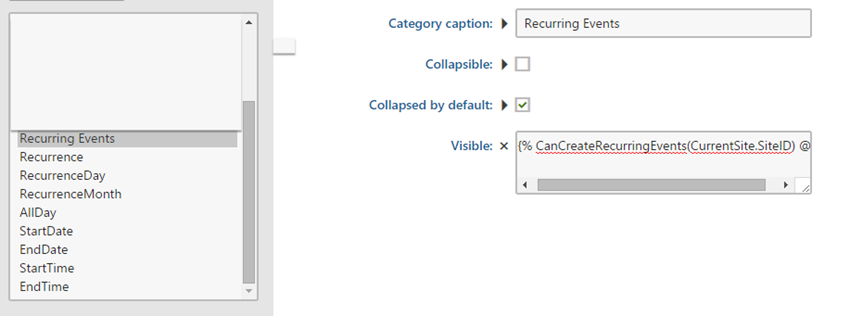
We can now go to the Event page type in the UI and set visibility on the fields at the category level. This way you group your fields together and only need to set it in one place.

Lets Do Some Testing
Now that we have the code in place, lets run a few tests. You can test this with only site simply by adding a new event and seeing if the Recurring Event fields are visible when you enter a new event. Now we need to test and see if they show for an "approved" site. So navigate to the custom table you created earlier. Add a new record and select your site and save.
Now navigate back to your content tree and add a new event. You should now see the Recurring Event section and when you click it, it will expand and show you the fields.
That's it!
If you don't work in a multitenancy environment, then this really doesn't help you that much. Although you should always keep in mind, just because you don't have multiple sites now, doesn't mean you won't later!
Best of luck and Happy Coding!